Dry gina curl has become a buzzword in the haircare industry, offering a revolutionary method to achieve stunning curls without heat. If you've ever wondered how to create bouncy, voluminous curls without damaging your hair, this guide is for you. We'll delve deep into the world of dry gina curl, exploring its benefits, techniques, and tips to help you achieve salon-quality results from the comfort of your home.
In today's fast-paced world, maintaining healthy hair while achieving stylish looks can be challenging. Many people rely on heat styling tools, which can lead to hair damage over time. Dry gina curl offers a refreshing alternative, allowing you to style your hair naturally and maintain its health. This technique is gaining popularity among hair enthusiasts and professionals alike.
Whether you're a beginner or a seasoned hair stylist, understanding the concept of dry gina curl can transform your haircare routine. In this article, we'll explore everything you need to know about this technique, including its history, benefits, and step-by-step instructions. Let's dive in!
Read also:Unlocking The Potential Of Binary Labs Peptides Your Ultimate Guide
Table of Contents
- The History of Dry Gina Curl
- Benefits of Dry Gina Curl
- How to Master the Dry Gina Curl Technique
- Essential Products for Dry Gina Curl
- Expert Tips for Perfect Curls
- Dry Gina Curl vs. Traditional Heat Styling
- Common Issues and How to Fix Them
- Different Styles You Can Achieve with Dry Gina Curl
- Maintaining Your Dry Gina Curls
- Conclusion
The History of Dry Gina Curl
The concept of dry gina curl dates back to the early 2000s when hairstylists began experimenting with natural hair styling techniques. Unlike traditional heat styling methods, dry gina curl focuses on enhancing the natural texture of the hair while minimizing damage. This technique gained traction as more people became aware of the harmful effects of heat styling on hair health.
Initially, dry gina curl was primarily used in salons by professional stylists. However, with the rise of social media platforms like Instagram and YouTube, the technique quickly became accessible to the general public. Today, dry gina curl is celebrated for its ability to create beautiful, bouncy curls without compromising hair integrity.
How It Evolved Over Time
Over the years, dry gina curl has evolved significantly. Hairstylists have developed new techniques and tools to enhance the process, making it more efficient and effective. The introduction of innovative haircare products has also played a crucial role in popularizing this method.
- In the early stages, stylists relied on simple tools like socks and scarves.
- As the technique gained popularity, specialized tools such as curlformers and flex rods were introduced.
- Today, dry gina curl incorporates advanced products and methods to achieve a wide range of styles.
Benefits of Dry Gina Curl
Dry gina curl offers numerous benefits that make it an attractive option for hair enthusiasts. Below are some of the key advantages of this technique:
- Minimizes Hair Damage: By avoiding heat, dry gina curl preserves the natural structure of your hair, reducing the risk of damage.
- Enhances Hair Health: This technique promotes healthier hair by maintaining moisture levels and reducing breakage.
- Cost-Effective: Unlike heat styling tools, which require frequent replacements, dry gina curl relies on affordable and reusable tools.
- Versatile Styling Options: You can achieve a variety of styles, from loose waves to tight curls, using this method.
Scientific Backing
Studies have shown that excessive heat styling can lead to protein loss, cuticle damage, and increased hair porosity. Dry gina curl addresses these issues by promoting a gentler approach to hair styling. According to research published in the Journal of Cosmetic Science, natural styling techniques like dry gina curl can significantly improve hair health over time.
How to Master the Dry Gina Curl Technique
Mastering the dry gina curl technique requires practice and patience. Follow these step-by-step instructions to achieve salon-quality results:
Read also:Exploring Carla Cute Vr A Comprehensive Guide To The Phenomenon
- Preparation: Start with clean, damp hair. Apply a curl-defining cream or mousse to enhance definition and hold.
- Sectioning: Divide your hair into manageable sections using clips or hair ties. This ensures even distribution of curls.
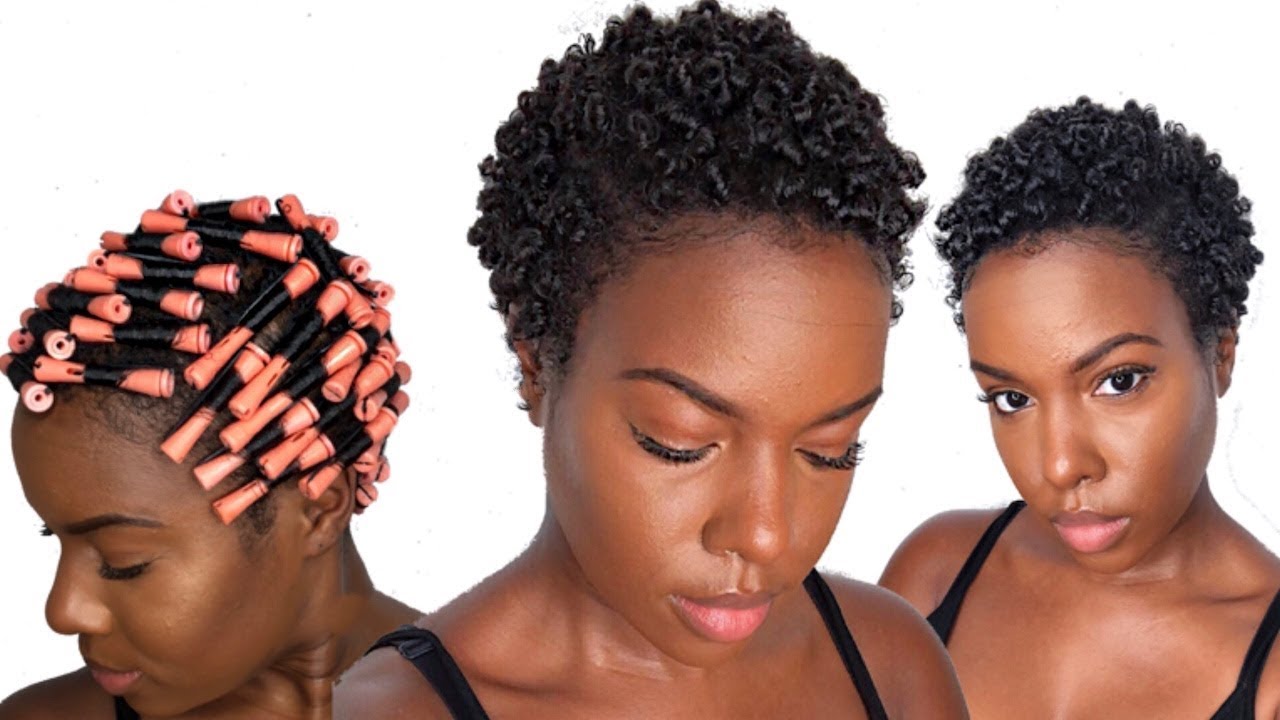
- Curling: Use curlformers, flex rods, or socks to create curls. Wrap each section carefully, ensuring no tangles or knots.
- Setting: Allow the curls to set overnight or for at least 4-6 hours. Avoid touching or disturbing the curls during this time.
- Unwrapping: Gently unwrap the curls, starting from the ends. Use your fingers to scrunch and define the curls.
Tools You'll Need
To achieve perfect dry gina curls, you'll need the following tools:
- Curlformers or flex rods
- Curl-defining cream or mousse
- Hair clips or ties
- A wide-tooth comb
Essential Products for Dry Gina Curl
Selecting the right products is crucial for achieving successful dry gina curls. Here are some of the best products available in the market:
Top Curl-Defining Creams
- Ouidad Curl Quencher Hydrating Styling Cream
- Devacurl Supercream Rich Creme for Curls
- Shea Moisture Manuka Honey & Mafura Oil Intensive Hydration Curl & Shine Cream
Best Flex Rods
- Conair Flex Rollers
- Revlon Salon Air Flexi Rollers
- Wet n Wild Hair Rollers
Expert Tips for Perfect Curls
Here are some expert tips to help you achieve flawless dry gina curls:
- Use High-Quality Products: Invest in reputable curl-defining creams and styling tools for better results.
- Moisturize Regularly: Keep your hair hydrated to prevent dryness and breakage.
- Avoid Over-Manipulation: Minimize touching or disturbing the curls while they set to ensure definition.
- Practice Consistency: Regular practice will help you master the technique and achieve consistent results.
Dry Gina Curl vs. Traditional Heat Styling
While both methods aim to create curls, dry gina curl and traditional heat styling differ significantly in terms of process and results:
Key Differences
- Heat Exposure: Dry gina curl avoids heat, while traditional styling relies on high temperatures.
- Hair Health: Dry gina curl promotes healthier hair, whereas heat styling can lead to damage over time.
- Time Investment: Dry gina curl requires longer setting times, but the results last longer.
Common Issues and How to Fix Them
While dry gina curl is a fantastic technique, it can sometimes present challenges. Here are some common issues and solutions:
- Flat Curls: Increase the size of your curling tools or use a stronger curl-defining cream.
- Frizz: Apply a lightweight serum or oil to tame frizz and enhance shine.
- Uneven Curls: Ensure even distribution of product and consistent sectioning for uniform results.
Different Styles You Can Achieve with Dry Gina Curl
Dry gina curl is versatile and can be used to create a variety of styles:
Popular Styles
- Loose beach waves
- Tight ringlets
- Voluminous curls
- Understated S-shaped curls
Maintaining Your Dry Gina Curls
Proper maintenance is essential to keep your dry gina curls looking fresh and vibrant:
- Regular Trims: Trim split ends every 6-8 weeks to maintain healthy hair.
- Deep Conditioning: Use deep conditioning treatments weekly to nourish your hair.
- Gentle Handling: Avoid harsh brushing or pulling to prevent damage.
Conclusion
Dry gina curl offers a revolutionary approach to achieving stunning curls without compromising hair health. By following the techniques and tips outlined in this article, you can master this method and enjoy salon-quality results at home. Remember to use high-quality products, practice consistency, and prioritize hair maintenance for the best outcomes.
We encourage you to share your experiences with dry gina curl in the comments below. Your feedback and insights can inspire others on their haircare journey. Don't forget to explore our other articles for more tips and tricks to enhance your beauty routine!