Removing the third-row seat in your Dodge Durango can seem like a daunting task, but with the right guidance, it becomes a straightforward process. Whether you're doing it for maintenance, cleaning, or to free up space, understanding the steps involved is crucial. This guide will walk you through every detail, ensuring you're well-prepared for the job.
The Dodge Durango is renowned for its spacious interior and versatile seating options. However, there may come a time when you need to remove the third-row seat. This could be due to wear and tear, the need for additional cargo space, or simply for routine maintenance. Whatever the reason, having the knowledge to perform this task yourself can save you time and money.
In this article, we'll delve into the specifics of Dodge Durango 3rd row seat removal. We'll cover everything from the tools you'll need to the step-by-step process, along with helpful tips and common pitfalls to avoid. By the end, you'll have all the information you need to confidently tackle this project.
Read also:Leana Deeb Erome A Comprehensive Guide To Her Life Career And Impact
Table of Contents
- Tools Needed for Dodge Durango 3rd Row Seat Removal
- Preparation Steps Before Removing the Seat
- Step-by-Step Removal Process
- Common Issues and How to Fix Them
- Reinstallation of the Third Row Seat
- Maintenance Tips for Your Dodge Durango
- Safety Tips During the Removal Process
- Cost Considerations for DIY vs Professional Help
- Alternatives to Removing the Third Row Seat
- Conclusion
Tools Needed for Dodge Durango 3rd Row Seat Removal
Before you begin the process of removing the third-row seat in your Dodge Durango, it's essential to gather the necessary tools. Having the right tools will make the job easier and more efficient. Here's a list of what you'll need:
Basic Tools
- Screwdriver (Phillips and flathead)
- Socket wrench set
- Pliers
- Flashlight
- Gloves for protection
Specialized Tools
- Seat removal tool (optional but recommended)
- T-handle socket wrench (for tight spaces)
While most of these tools are standard, the seat removal tool can be particularly helpful if you're dealing with stubborn bolts or clips. Additionally, wearing gloves will protect your hands from sharp edges and dirt.
Preparation Steps Before Removing the Seat
Proper preparation is key to a successful removal process. Here are some steps to ensure you're ready:
Cleaning the Area
Start by vacuuming the area around the third-row seat. This will help prevent dirt and debris from spreading during the removal process. It also makes it easier to see and access all the necessary components.
Clearing the Space
Remove any items stored in the cargo area or on the third-row seat. This includes floor mats, cargo nets, or any other accessories that might get in the way. Clearing the space will give you more room to work and reduce the risk of damaging your belongings.
Read also:Flo Evenson A Rising Star In The World Of Music And Arts
Checking for Obstructions
Inspect the area around the seat for any obstructions, such as wiring or brackets, that might interfere with the removal process. If you find any, take note of their location and plan how to work around them.
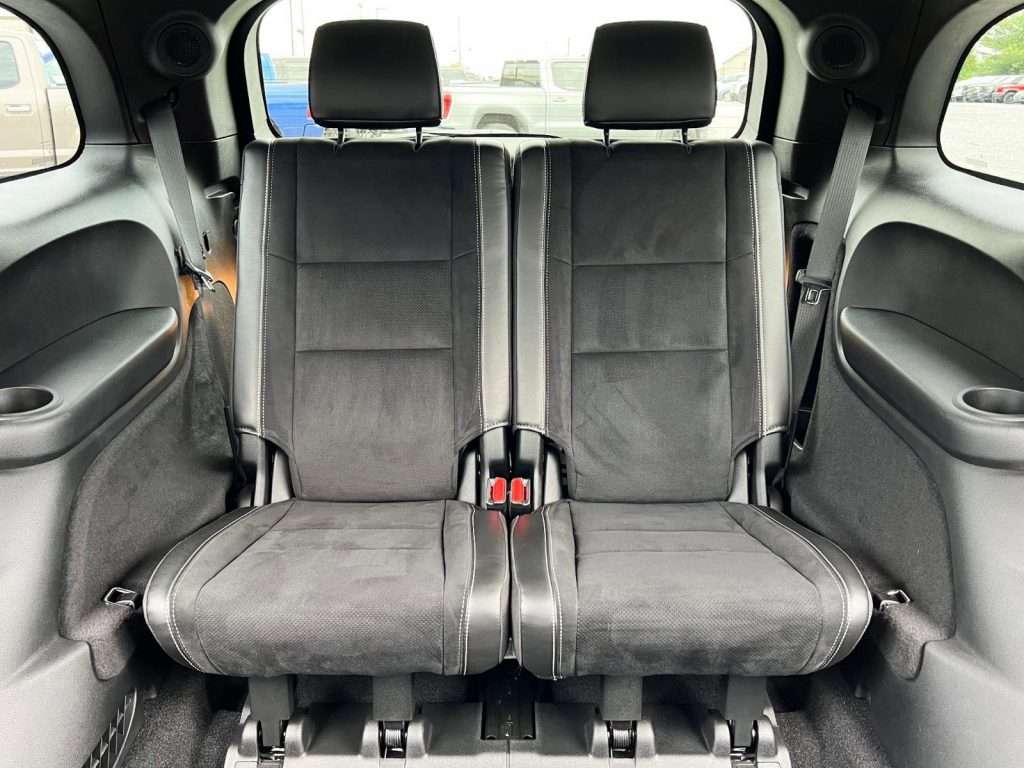
Step-by-Step Removal Process
Now that you're prepared, let's dive into the actual removal process. Follow these steps carefully to ensure a smooth operation:
Step 1: Locate the Release Mechanism
Most Dodge Durango models have a release mechanism located under the seat cushion. Look for a lever or handle that you can pull to release the seat from its mounting points.
Step 2: Detach the Seat
Once the release mechanism is activated, gently lift the seat upward to detach it from the mounting brackets. Be cautious, as the seat can be heavy, and you might need assistance to lift it out of the vehicle.
Step 3: Remove the Seat Bolts
Using a socket wrench, remove the bolts that secure the seat to the vehicle's frame. There are usually four bolts, two on each side of the seat. Once the bolts are removed, the seat can be fully lifted out.
Common Issues and How to Fix Them
While the removal process is generally straightforward, you may encounter some common issues. Here's how to address them:
Stuck Bolts
If the bolts are rusted or stuck, use a penetrating oil like WD-40 to loosen them. Let the oil sit for a few minutes before attempting to remove the bolts again.
Broken Clips
Sometimes, the plastic clips that hold the seat in place can break. If this happens, you can replace them with new clips from an auto parts store or use a zip tie as a temporary fix.
Reinstallation of the Third Row Seat
After you've completed your maintenance or cleaning, it's time to reinstall the third-row seat. Follow these steps:
Step 1: Position the Seat
Align the seat with the mounting brackets and gently lower it into place. Ensure that the seat is securely positioned before proceeding.
Step 2: Secure the Bolts
Reattach the bolts to the mounting brackets, tightening them securely with a socket wrench. Make sure the seat is stable and doesn't wobble.
Step 3: Test the Seat
Test the seat by pulling on it to ensure it's firmly in place. Also, check the release mechanism to confirm it functions properly.
Maintenance Tips for Your Dodge Durango
Regular maintenance is essential for keeping your Dodge Durango in top condition. Here are some tips to help you maintain your vehicle:
Regular Cleaning
Regularly clean the interior and exterior of your vehicle to prevent dirt buildup and damage. Use high-quality cleaning products designed for automotive use.
Check for Wear and Tear
Inspect your vehicle's components, including the seating, for signs of wear and tear. Address any issues promptly to avoid more significant problems down the line.
Safety Tips During the Removal Process
Safety should always be a priority when working on your vehicle. Here are some tips to keep you safe:
Wear Protective Gear
Always wear gloves and safety glasses to protect yourself from sharp edges and debris.
Work in a Well-Lit Area
Ensure you have adequate lighting when working on your vehicle. This will help you see all the components clearly and avoid mistakes.
Cost Considerations for DIY vs Professional Help
Deciding whether to tackle the removal yourself or hire a professional depends on several factors:
DIY Cost
Doing the job yourself can save you money, as you only need to invest in tools and possibly replacement parts. However, it requires time and effort.
Professional Cost
Hiring a professional mechanic can be more expensive, but it ensures the job is done correctly and efficiently. Consider this option if you're not comfortable with the process.
Alternatives to Removing the Third Row Seat
If you're looking for alternatives to removing the third-row seat, here are some options:
Folding the Seat
Most Dodge Durango models allow you to fold the third-row seat flat, providing additional cargo space without completely removing it.
Replacing the Seat
If the seat is damaged or worn out, consider replacing it with a new one. This can be a cost-effective solution if the existing seat is beyond repair.
Conclusion
Removing the third-row seat in your Dodge Durango is a manageable task with the right preparation and tools. By following the steps outlined in this guide, you can confidently perform the removal process and enjoy the benefits of additional space or a well-maintained vehicle.
We encourage you to share your experience or ask questions in the comments section below. Your feedback helps us improve and provide better content. Additionally, explore our other articles for more tips and tricks on maintaining your Dodge Durango.
Remember, whether you choose to do it yourself or seek professional help, regular maintenance is key to ensuring your vehicle's longevity and performance.